Effortlessly Set up Xfinity Email Account (Comcast Email) Today! Tired of juggling multiple email addresses? Streamline your communication with a powerful Xfinity email account (formerly known as Comcast email). Our comprehensive guide walks you through every step, from creating your account to configuring settings on your preferred device.
Conquer email confidently and enjoy the perks of secure messaging, ample storage, and seamless integration with other Xfinity services.
Evolution of Xfinity Email Account (Comcast Email)
The roots of Xfinity email can be traced back to Comcast, a key player in the telecommunications domain. As the digital era unfolded, so did Comcast’s approach to email services, witnessing continuous enhancements in technical infrastructure and user-centric features.
The transition from Comcast to Xfinity wasn’t a rebranding; it signaled a broader vision to adapt to emerging technological trends and meet evolving user expectations.
Observing Xfinity’s email service trajectory is akin to witnessing the growth of an entity—firmly grounded in foundational values yet nimble enough to embrace the winds of change.
How to Set Up Xfinity Account
Here’s a step-by-step guide on how to set up Xfinity account:
Prerequisites
- Xfinity Service: You’ll need an active Xfinity service (Internet, TV, or Voice) to create an account.
- Account Details: Have your account number or service address handy.
- Personal Information: Your name, date of birth, email address, and phone number.
Steps to Set Up Xfinity Account
1. Initiate Xfinity Account Creation:
- Navigate to the official Xfinity website: https://www.xfinity.com/getstarted
- Locate and click the “Create an Xfinity ID” button (the exact placement may vary on the website).
2. Select Verification Method:
- Mobile Phone: Enter the phone number associated with your potential Xfinity services. You will receive a verification code via text message.
- Social Security Number (SSN): Provide the last four digits of the account holder’s SSN, their date of birth, and a phone number for verification.
3. Establish Your Xfinity ID:
- Choose Your ID Type: Select from one of the following options:
- Create a new Xfinity email address.
- Use an existing personal or Comcast com email address
- Use your mobile phone number
- Set a Secure Password: Create a strong, unique password. Avoid reusing passwords from other online accounts.
4. Provide Personal Information
- Enter your full name (first and last), physical address, and any other relevant information requested by Xfinity.
Additional Considerations:
- Primary Account Holder: The initial Xfinity ID created will be designated as the Primary account. This ID has full administrative privileges over billing, services, and user management.
- Additional Users: The Primary account holder can invite others to create Xfinity IDs. This allows individual user preferences without granting full account access.
- Security: Prioritize account security by employing strong passwords and exercising caution with emails or links purporting to be from Xfinity.
For Further Assistance:
What is Xfinity ID?
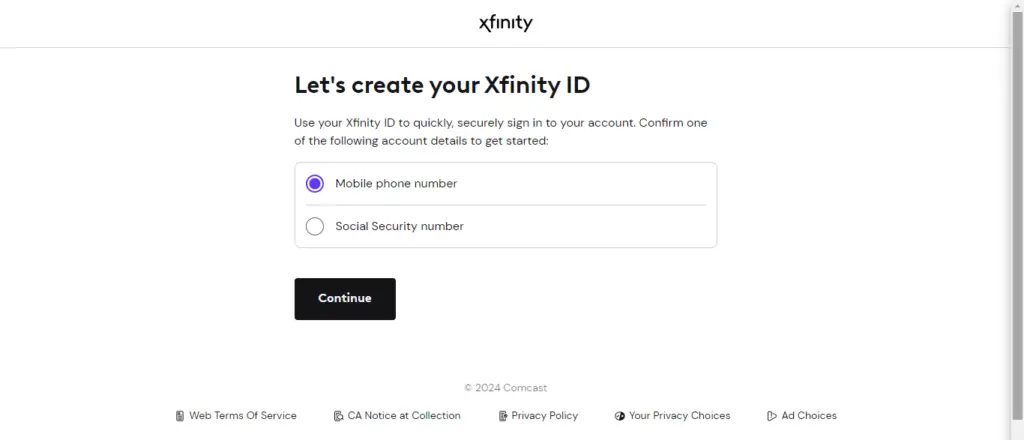
Xfinity ID is a unique username to access various Xfinity services, including email, Xfinity WiFi hotspots, the Xfinity app, and online account management.
How to Set Up Xfinity Email Account (Comcast Email)
Xfinity (formerly Comcast) provides email services to its internet customers. Setting up Xfinity email is easy, whether you want to use their web-based platform or access your emails through a third-party email client.
Before You Begin
To set up your Xfinity email, you’ll need:
- Your Xfinity ID and password
- An email client if you prefer this method (e.g., Outlook, Apple Mail, Gmail, etc.)
How to Create Xfinity ID
There are two ways to create Xfinity ID:
- Using your mobile phone number:
- Visit xfinity.com/getstarted or click “Create an Xfinity ID” from any Xfinity sign-in page.
- Select “Mobile phone number” as the verification method.
- Enter the mobile phone number associated with your Xfinity account.
- You’ll receive a verification code via text message. Enter the code to confirm.
- Create your Xfinity ID (username and password).
- Using your Social Security number (SSN):
- Visit xfinity.com/getstarted or click “Create an Xfinity ID” from any Xfinity sign-in page.
- Select “Social Security number” as the verification method.
- Enter the last four digits of the account holder’s SSN, date of birth, and phone number associated with the account.
- Set up Xfinity ID (username and password).
Important notes:
- Choose a strong and unique password for your Xfinity ID.
- You can also create an Xfinity ID through the Xfinity app.
- If you encounter any issues during the creation process, contact Xfinity customer support for assistance.
Accessing Your Xfinity Email Online
- Go to: connect.xfinity.com on your computer, tablet, or smartphone.
- Click: The “Account” icon in the top-right corner.
- Select: “Check Email”.
- Enter: Your Xfinity ID and password.
Xfinity Email Account Setup Guide
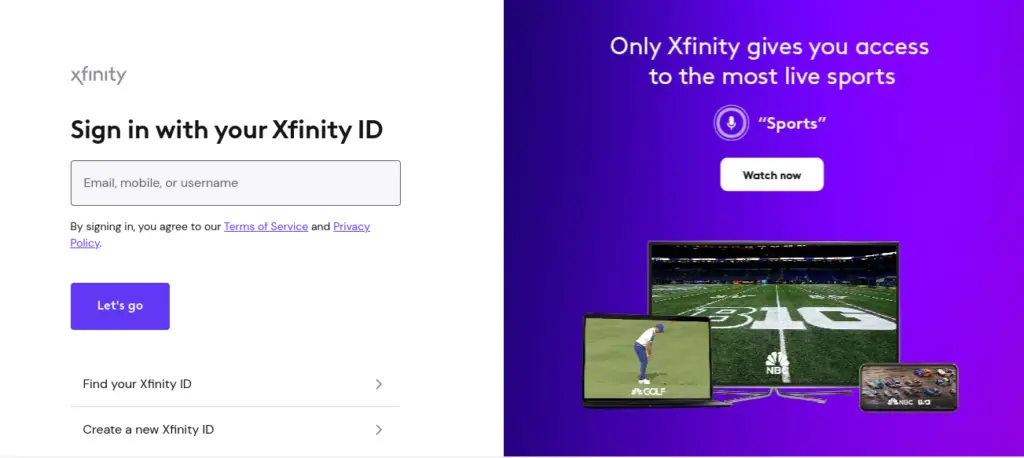
Method 1: Using Xfinity Connect (Webmail)
- Go to the Xfinity Connect website
- Log in: Enter your Xfinity ID and password.
- Access your email: Click on the “Email” icon or tab to open your Xfinity inbox.
That’s it! You can now send and receive emails through Xfinity’s webmail interface.
Method 2: How To Up Xfinity Email on a Third-Party Email Client
- Gather your Xfinity email set up:
- Incoming Server (Xfinity IMAP Settings): imap.comcast.net
- Incoming Port: 993 (with SSL)
- Outgoing Server (Xfinity SMTP Settings): smtp.comcast.net
- Outgoing Port: 587 (with TLS) or 465 (with SSL)
- Open your email client’s settings: The location of these settings will vary by client. Refer to your client’s help section if you need guidance.
- Add a new account: Look for the option to “Add Account” or something similar.
- Choose IMAP: Select IMAP as your account type, as it’s generally preferred for its syncing capabilities.
- Enter your Xfinity email information: Fill in the following details:
- Your Name: The name you want displayed on outgoing emails.
- Email Address: Your full Xfinity email address (e.g., [email address removed])
- Password: Your Xfinity email password
- Incoming and Outgoing Server settings: Use the settings provided above.
- Save your settings: Your client may attempt to auto-configure, but you may need to save the settings manually.
Method 3: Xfinity Email Set Up (Manually)
- Use these Xfinity Email settings:
- Incoming Mail Server: imap.comcast.net (Port 993 with SSL) or pop3.comcast.net (Port 995 with SSL)
- Outgoing Mail Server (Xfinity SMTP Settings): smtp.comcast.net (Port 587 with TLS)
- Username: Your Xfinity email address
- Password: Your Xfinity password
- Consult your email program’s documentation: For specific instructions on adding a new email account.
Comcast Email Settings
Here are the Comcast email settings you’ll need to configure most email clients:
Incoming Mail Server (IMAP)
- Server: imap.comcast.net
- Port: 993
- Requires SSL: Yes
Incoming Mail Server (POP3)
- Server: pop.comcast.net
- Port: 995
- Requires SSL: Yes
Outgoing Mail Server (Xfinity SMTP Settings)
- Server: smtp.comcast.net
- Port: 587
- Requires TLS: Yes
- Requires Authentication: Yes (your Comcast email and password)
Important Points:
- IMAP vs. POP3: IMAP is generally preferred. It syncs your email across devices, while POP3 downloads messages to a single device and may delete copies from the server.
- Authentication: Ensure your email client is set up to use your Comcast email address and password for outgoing mail authentication.
How to Set Up Your Email Client Using The Comcast Email Settings
The exact process for setting up your email client will vary. Here’s a general guide:
- Locate the email settings: Find the section in your email client where you can configure accounts. This is often under “Settings” or “Accounts.”
- Add a new account: Choose the option to add a new email account.
- Select manual setup: Many email clients auto-detect settings, but for Comcast, it’s best to choose “manual setup” or a similar option.
- Choose IMAP or POP3: Decide which protocol you prefer.
- Enter the Comcast email settings: Input the incoming and outgoing server information listed above.
- Authentication: Provide your Comcast email address and password when prompted.
Xfinity Comcast Email Login
Here’s how to log in to your Xfinity/Comcast email:
Method 1: Xfinity Connect Webmail
- Go to the Xfinity Connect website: Xfinity Connect website
- Sign in:
- Click the Account icon (person image) in the top-right corner of the screen.
- Enter your Xfinity ID (this is usually your email address).
- Enter your password.
- Click “Let’s go“.
- Check your Email: After login, you’ll be on your Xfinity dashboard. Click the “Email” icon or look for an option labeled “Check Email” to access your inbox directly.
Method 2: Third-Party Email Client (Outlook, Apple Mail, etc.)
- If you’ve already set up Xfinity email on a separate email client, simply launch the software and your mail should sync automatically.
Having trouble?
- Forgot password? On the Xfinity login page, click the “Forgot Password?” link and follow the instructions to reset.
- Double-check your Xfinity ID. Make sure you’re using the correct email address.
Understanding Xfinity Email Interface
Here’s a guide to understanding the Xfinity Email interface:
Accessing Xfinity Email:
- Web browser:
- Go to xfinity.com/getstarted
- Sign in with your Xfinity ID and password
- Email app:
- Configure your email app using the following settings:
- Incoming Mail Server: imap.comcast.net
- Incoming Mail Server Port: 993 (SSL ON)
- Outgoing Mail Server: smtp.comcast.net
- Outgoing Mail Server Port: 587 (TLS)
- Configure your email app using the following settings:
Interface Layout:
- Top toolbar:
- Compose: Create new emails
- Refresh: Update your inbox
- Settings: Customize email preferences
- Folders pane:
- Inbox, Sent, Drafts, Trash, and other custom folders
- Email list:
- Displays your emails with sender, subject, date, and optional preview
- Reading pane:
- View the content of selected emails (optional)
Key Features:
- Composing emails:
- Click “Compose” to write new emails
- Add recipients, subject, body, and attachments
- Reading emails:
- Click on an email to view it in the reading pane or open it in a new window
- Managing emails:
- Move emails between folders
- Mark emails as read/unread
- Flag emails for follow-up
- Delete emails
- Searching emails:
- Use the search bar to find specific emails
- Customizing settings:
- Adjust email layout, notifications, signatures, and more
Additional Features:
- Advanced features:
- Change email view (vertical, horizontal, list)
- Enable contact pictures
- View exact email dates and sizes
- Integration with other Xfinity services:
- Access Xfinity Voicemail and Call History
- Manage Xfinity account settings
Additional Tips:
- Use keyboard shortcuts:
- Speed up common actions like composing, replying, and deleting
- Organize with folders:
- Create folders to categorize emails
- Filter incoming emails:
- Set up rules to automatically sort emails
- Utilize the search bar:
- Find emails quickly and efficiently
- Explore the settings:
- Customize your email experience to your liking
Understanding Xfinity Connect
Xfinity Connect is the online portal for managing your Xfinity account and services. It allows you to:
- View and pay your bill
- Manage your Xfinity Internet, TV, and voice services
- troubleshoot technical issues
- Access Xfinity WiFi hotspots
- Manage your Xfinity ID and password
- And much more!
Here’s a quick overview of what you can find on Xfinity Connect:
Homepage: The homepage provides an overview of your account information, including your current balance, due date, and active services. You can also access quick links to popular tasks, such as paying your bill, managing your services, and troubleshooting.
My Account: The My Account section allows you to view and manage all aspects of your Xfinity account, including your billing information, service details, and preferences.
Internet: The Internet section allows you to manage your Xfinity Internet service, including viewing your data usage, troubleshooting connection issues, and upgrading your plan.
TV: The TV section allows you to manage your Xfinity TV service, including viewing your channel lineup, setting up parental controls, and ordering on-demand content.
Voice: The Voice section allows you to manage your Xfinity Voice service, including viewing your call history and voicemail and managing features like call forwarding.
Support: The Support section provides access to various resources to help you troubleshoot technical issues, get answers to your questions, and contact Xfinity customer service.
I highly recommend signing up for Xfinity Connect if you’re an Xfinity customer. It’s a convenient and easy way to manage your account and services.
Optimizing Your Xfinity Email Experience

- Regular software updates: Ensure you use the latest Xfinity email client version for a smoother experience and enhanced security.
- Using filters: Streamline email organization by setting up filters to automatically sort incoming emails into respective folders, reducing clutter and boosting productivity.
- Customizing notifications: Tailor notifications to receive alerts only for priority emails, avoiding unnecessary distractions for heavy email users.
Security Tips for Xfinity Email Users
- Regular password changes: Bolster email security by periodically changing your Xfinity email password.
- Beware of phishing attempts: Exercise caution with emails requesting personal details, as legitimate services like Xfinity will never solicit sensitive information via email.
- Two-factor authentication: Strengthen security by enabling two-factor authentication, requiring a second form of identification beyond just your password.
Xfinity Email Alternatives
Here are some popular and well-regarded alternatives to consider if you’re looking to switch away from Xfinity Email:
Free Xfinity Email Alternatives:
- Gmail (Google): One of the most popular email providers worldwide. Features include powerful search, excellent spam filtering, seamless integration with other Google services (Calendar, Drive), and generous storage.
- Outlook.com (Microsoft): If you’re comfortable with the Microsoft ecosystem, Outlook offers a clean interface, good integration with OneDrive, Calendar, useful categorization tools, and a focused inbox feature.
- ProtonMail: Highly注重隐私. Offers end-to-end encryption and is based in Switzerland with strong privacy laws. Limited storage in the free plan but excellent if security is your top priority.
- Yahoo! Mail: A classic alternative with ample storage, decent spam/filtering tools, and a newsfeed-like view that some users love.
- Zoho Mail: Offers ad-free email, business-focused features, and integration with other Zoho productivity tools.
Paid Xfinity Email Alternatives (Great for businesses or power users):
- Fastmail: Emphasizes speed, reliability, and excellent customer support. Features plenty of customization and powerful email management tools.
- Tutanota: Focuses on privacy and end-to-end encryption, similar to ProtonMail. Made in Germany, also governed by strong privacy laws.
- iCloud Mail (Apple): Deeply integrated into the Apple ecosystem. Offers a clean design and works seamlessly with your Apple devices. Requires an Apple iCloud paid plan for larger storage.
Factors to Consider When Choosing Xfinity Email Alternatives:
- Storage Needs: How much storage do you need? Free plans vary, with Gmail usually offering the most on this front.
- Features: Do you need robust filtering, calendar integration, or specific productivity tools?
- Privacy: Is end-to-end encryption paramount? Providers like ProtonMail and Tutanota excel in this area.
- Ease of Use: Which interface feels most intuitive for your workflow?
Wrapping Up: Stay Connected with Your Xfinity Emil Account
Congratulations! You’ve successfully set up your Xfinity emil account and are now ready to send and receive messages. Remember, this email address is your gateway to a range of Xfinity services, so be sure to explore its full potential.
Here are some quick reminders to optimize your Xfinity email experience:
- Personalize your settings: Adjust your inbox layout, notification preferences, and signatures to match your workflow.
- Organize with folders: Create custom folders to categorize emails and keep your inbox clutter-free.
- Stay secure: Choose a strong password and enable two-factor authentication for added protection.
- Explore advanced features: Use the search bar, keyboard shortcuts, and contact management tools to streamline email interactions.
- Xfinity Connect is your hub: Remember, your Xfinity email address is seamlessly integrated with Xfinity Connect, the portal for managing all your Xfinity services.
By following these tips and familiarizing yourself with the Xfinity email interface, you’ll be well on your way to mastering email communication and enjoying the full benefits of your Xfinity account.
If you have any further questions or encounter issues, don’t hesitate to contact Xfinity customer support for assistance. Happy emailing!
FAQs
Here’s a breakdown of some frequently asked questions about XfinityEmails, along with answers and links for more information.
General Xfinity Emil FAQs
- Where can I access my Xfinity Email? You can access it through the Xfinity Connect web portal ([invalid URL removed]) or via a compatible email client (e.g., Outlook, Thunderbird) using the correct settings.
- How do I create an Xfinity Email account? You automatically get an Xfinity email account when you sign up for Xfinity Internet service. The primary account is linked to your Xfinity ID. You can create additional email addresses within your Xfinity account settings.
- How do I reset my password? Go to the Xfinity ID login page and follow the “Forgot Password” link. You’ll need your username and verification information to proceed.
- Why aren’t I receiving emails?
Check these areas:- Spam folder: Ensure the email hasn’t been misidentified as spam.
- Storage: You won’t receive new emails if your inbox is full. Delete old messages or upgrade your storage.
- Filters: Ensure you don’t have filters accidentally diverting or deleting messages.
- How do I change my Xfinity Email settings? This is done through the Xfinity Connect web portal. You can change your password, email forwarding, spam settings, and more.
Xfinity Email After Disconnecting Service
- Can I keep my Xfinity email after disconnecting other Xfinity services? Yes, but you must have logged in to Xfinity email within 90 days before disconnecting service.
- If I keep my email, does it work exactly the same? You’ll retain most functionality, but you won’t be able to create new email addresses or change existing ones.
Troubleshooting and Support
- Where can I find more help and support for Xfinity Email? The Xfinity support website has extensive resources: https://www.xfinity.com/support/articles/xfinity-connect-email-faqs
Additional Important Notes
- Email inactivity: Log into your Xfinity Email at least once every 12 months to prevent deactivation.
- Security: Xfinity includes security features, but practicing good online security is vital. Use a strong password and be wary of suspicious emails.
Discover more from Digital Wealth Guru
Subscribe to get the latest posts sent to your email.



Comments